Stuff it!

Processed with Moldiv

Given that my partner is half Lebanese, we often eat Arabic food.  I was looking through some middle eastern cookbooks and it struck me how many of their recipes consist out of stuffed vegetables.  From potatoes, to courgettes (zucchini), peppers, tomatoes, eggplants, onions and even cabbage gets filled with all kinds of deliciousness.  The fillings can be rice, ground meat or chicken mixed with spices, fresh herbs and nuts.

Last weekend I made stuffed potatoes. Traditionally they are eaten with rice but even for a carb-o-holic like myself this is too much of a good thing so I serve it with a simple tomato and cucumber salad.

It’s the spices that provide the middle eastern flavor: in this version I used Bokharat, an Arabic 7 spice mix.  You can find it in most middle eastern shops, but you’ll also find the recipe on my blog if you fancy making it yourself or can’t find it anywhere.

Ingredients (makes enough for 4 people)

  • 1 kilogram of potatoes, preferably new potatoes but ordinary ones work as well
  • 2 tablespoons of Arabic 7 spices
  • ground meat (beef or lamb)*
  • 1 large onion cut up in small pieces
  • pine nuts
  • 1 liter of peanut or sunflower oil for frying
  • 2 cans of chopped tomatoes
  • 2 cloves of garlic grated or cut up in small pieces

*if you want to make a vegetarian version you can replace the ground meat with cooked rice

Instructions

  • Peel the potatoes.
  • Empty out the potato: you can do this which ever way you find easiest.  You can buy a special tool for this however personally I find that a small teaspoon works best.  Don’t use a knife, the potatoes are slippery and you risk cutting yourself.
  • Pour the oil in a deep pot and heat it up.  To prevent any overflow, make sure you do not fill the pot more than half.  You can check if the oil is hot enough for frying by putting a small piece of bread (or potato) in it and it should start frying immediately.  If that is not the case, the oil is not hot enough yet.
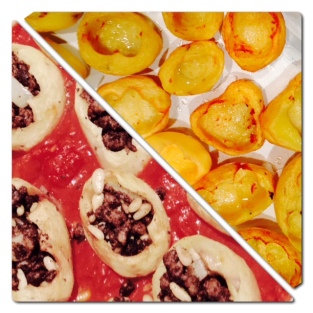
  • Fry the potatoes in the oil. The goal is not to get them golden brown and crispy, fry them gently until you start seeing bubbles on the outside of the potatoes and they have slightly softened.
  • Let the fried potatoes cool down on some some kitchen towel.
  • Take a pan and over medium heat fry half of the onion mixture together with the half of the chopped garlic and all of the pine nuts until the onions are soft and the pine nuts are golden brown.
  • Add the beef to the onion/garlic/pine nut mixture and fry it.
  • In a separate pan fry the remaining onion and garlic and add the chopped tomatoes.  Bring the tomato mixture to the boil and let it simmer for 10 minutes.
  • Fill the potatoes with the meat mixture.
  • Taken an oven dish and poor the tomato sauce into it.  Arrange the potatoes in the dish and bake in the oven for 30 minutes at 200°C.
  • Take the dish out of the oven and let cool slightly.  Then take half a lemon and squeeze it over the potatoes.

That’s it! Let’s eat!

signature

Arabic 7 spice mix

Arabic 7 spice mixI really like this spice blend and use it very often.  It gives a lovely deep and warm flavor to food without being overly hot.  It works especially well on roasted meats or vegetables but you can use it as well in stews, soups or sauces.

In Brussels we are quite spoiled, we have several middle eastern supermarkets where we can buy the spice mix ready made.  However I have noticed that the taste is far better when I make it myself.

If you want to have a go at it you just need to respect the proportions listed below (if you want a bigger batch, you just double or triple them).  I recommend starting off with whole spices which have been dry roasted which you then put in the coffee blender.  However you can also use the spices already in their powder form.  Store the mix in an airtight container for a period of maximum 6 months.

There are variations on this spice mix, depending on the country they are used in, however I find that the basic flavors are the same no matter what the variant is.

The ingredients for the Arabic 7 spice mix are:

  • 2 tablespoons black pepper
  • 2 tablespoons paprika
  • 2 tablespoons cumin
  • 1 tablespoon coriander
  • 1 tablespoon cloves
  • 1 teaspoon nutmeg
  • 1 teaspoon cinnamon
  • 1/2 teaspoon cardamon

Don’t use spices that have been lingering in your cupboard for months – spices loose a lot of their punch and flavor over time.  And one last thing: this spice mix pares very well with the sharpness of lemon juice.  So when I roast meat or veggies that have been coated in this spice I always squeeze the juice of half a lemon on it before serving.  I really boosts the flavor.

I hope you enjoy it!

signature

Cannelés de Bordeaux

image1
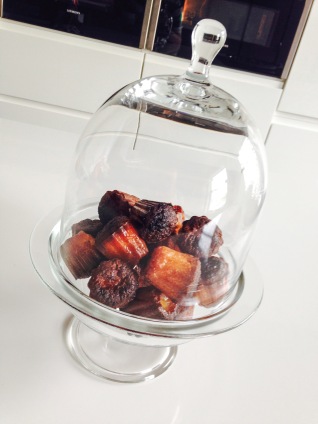
Since I have been spending a lot of time in Paris for work, I have become a lunch enthusiast.  When I’m in Brussels I hardly ever find time for lunch and when I do you’ll find me chewing on some sad sandwich in front of my computer.  My new found fondness for the lunch hour ‘might’ have something to do with the fact that French people drink wine at lunch (bonus!) and always have dessert (double bonus!).  During one of these lunches I was introduced to Cannelés de Bordeaux and ever since I have been obsessed with them.  I’ve tortured my French accountant to give me her recipe (merci Sophie!) and I must say … they are delicious.

A cannelé is a little cake which is crispy on the outside and has a pancake consistency on the inside (European style pancake, not the US style ones).   There is one thing you’ll love about this recipe and one thing you’ll hate.  You’ll love the fact that you have to eat them the day you make them because they lose their crispiness after a couple of hours.  So no excuses, the whole batch needs to be devoured!  Trust me, I have tried everything to keep them crispy and nothing seems to work.  One of my colleagues, who is from the Bordeaux region assured me that even patisseries over there make them fresh every day because of this very reason.  Now for the thing you won’t like: you need to plan. Whenever you feel a cannelé craving coming along you can’t just make them.  The batter needs to rest for at least 12 hours (24 hours or 36 hours is even better).  The cannelé batter is similar to pancake batter and the longer you let it rest the better it gets.  It has something to do with air bubbles and gluten, all things that I don’t understand but I have tested it and it’s true: you need to wait at least 12 hours.  There are eggs in this so I wouldn’t go beyond 36 hours of resting time.  Don’t be surprised at the fact that the batter is very liquid, this is normal.

In the version below I add brown rum, this is the traditional way of making them.  If you like a change or you don’t want to put alcohol in them you can add orange flower essence (same amount as the rhum in the recipe below).

You can find the molds to make cannelés in any basic cooking shop.  People will tell you that it is a sin to use silicone molds and that the only way to go is using copper molds.  However, these are crazy expensive and silicone works as well.  Next to the normal size molds, there are also molds for mini cannelé, I prefer these just because they are bite size.  For the mini versions, you just need to take into account that the cooking time is slightly reduced (otherwise you’ll end up with little black rocks instead of sweet crispy cannelés).

The recipe below will make 12 normal size cannelés and 24 mini cannelés.

Ingredients

  • 1 tablespoon of vanilla essence
  • 2 tablespoons of brown rhum
  • 1/2 liter of full fat or semi skimmed milk
  • 2 eggs
  • 2 egg yolks
  • 100 grams of flower
  • 250 grams of powdered sugar (you can use normal caster sugar as well, powdered sugar is easier to mix in)
  • 50 grams of butter
  • a pinch of salt

Instructions

  • Put the butter and vanilla essence in the milk and gently heat up the milk so that the butter melts.
  • Once the butter is melted and the milk is hot, turn off the heat so the mixture can cool down somewhat (we’ll mix eggs into this and if the mixture is too hot you obtain scrambled eggs).
  • Put the eggs, egg yolks and powdered sugar in a bowl and with a wisk mix them together until the mixture slightly turns white.
  • Add the flower and salt to the egg mixture and mix well.
  • Now, whilst stirring the egg/sugar/flower/salt batter add the hot milk mixture, keep stirring until there are no more lumps.
  • Poor the batter in a containers and let it rest in the fridge for at least 12 hours.
  • When you are ready to bake preheat your oven for 15 minutes on 250°C.  Poor the batter into the molds and bake them for 20 minutes on 250°C.  This will ensure the cannelés are crispy.  Then turn the heat down to 180°C and leave them for another 40 minutes in the oven.
  • After this take them out and leave them in the silicone molds to FULLY cool.
  • Once cooled down you will be able to pop them out of the molds easily … AND EAT THEM!

I hope you enjoy them!

Let’s eat!

signature

Wonderful Welsh cakes

Welsh  Cakes I don’t know what the weather has been like in your neck of the woods but after a glorious week of sunshine, it rained most of the weekend. Ideal weather for some baking (and eating)!  I keep a box in which I throw recipes I come across that are interesting and that I might want to try.  The other day I was rummaging through it and I found a handwritten recipe for Welsh cakes which was handed down to me by one of my former work colleagues.  She is Welsh and whenever she used to go to Wales for a visit her mother would make a batch of these babies for the office and that is how I discovered them.  Surprisingly I had never tried to make them so this weekend I got the flour, sugar and butter out and I gave it a go, much to the delight of my husband.

The best way to describe Welsh cakes is to say that they are the size of a cookie, but thicker and consistency wise they are in between a pancake and a scone.  Traditionally they contain spice (cinnamon or mixed spice) and raisins.  It is a very simple dough to make but what takes some time is baking them: they are cooked on a griddle (or in a pan if you don’t have a griddle).  They are not overly sweet; it is the powdered sugar at the end that gives them a sweet touch.

The recipe below makes 30 to 40 of them (depending on their size) and they keep a couple of days in an airtight container.

Ingredients

  • 500 grams of self raising flour
  • 80 grams of granulated sugar
  • 1 teaspoon of cinnamon (you can also use mixed spice)
  • 300 grams of butter
  • 1/4 of a teaspoon of salt
  • 150 grams of raisins
  • 1 egg
  • 2 tablespoons of milk (any kind – full fat, semi skimmed or skimmed)
  • 2 tablespoons of normal flour

Instructions

Welsh Cakes

  • Mix the self raising flour, sugar, salt and cinnamon together.
  • Cut 250 grams of butter into 1-2 cm squares.
  • Add the butter to the dry ingredients and use your hands to rub the flour and butter together until you get small crumbs. This is the same technique that is used to make crumble topping, but here you need to ensure that the crumbs are quite small.
  • Add the raisins and mix.
  • Crack open the egg in a small bowl and beat it slightly till the yolk and white is combined and then incorporate the egg into the dough.  At this point you will already notice that the dough will come together but it will need some additional moisture.
  • Of the two tablespoons of milk add one and work the dough some more, if the dough is still a bit too dry or not all the flour is incorporated, add the second tablespoon of milk.  At this point you’ll obtain a cookie like dough, which is slightly dry and will crack easily: don’t worry this is the way it should be.  Once the dough has come together, it is not necessary to knead it any further.
  • To make the roll out process easier, cut the dough in three equal parts.
  • Put some of the normal flour on a clean kitchen surface and put some on your rolling pin.  Roll out the dough until it is about 1 cm thick.
  • Take a cookie cutter and cut out shapes.  Repeat this until you have used all the dough.
  • Put a pan on medium heat and let a little bit of butter melt in the pan (like maybe 15 grams of butter).  Don’t use too much butter, the goal is merely to grease the pan and add some flavor to the cakes.
  • Once the butter is melted you put in a batch of Welsh cakes and fry/cook/bake them for 3 minutes each side.  You will see that after 3 minutes they will have a nice brown crust and then you flip them over.  Don’t be tempted to cook them longer as they will burn and turn out dry.  Ideally they should still be a bit moist in the center.  If you want to do a test run, you start out with one cake and see how it goes.
  • Let them cool down and then sprinkle with powdered sugar.

I hope you enjoy these cakes as much as we did.

Let’s eat!

signature

Crunchy apple tartelettes

Processed with MoldivI don’t think there is an original recipe for apple tart.  Everyone’s recipe is slightly different and has often been handed down to them by their mother or grandmother.  Depending on the choice of apple, the pastry and the flavorings (cinnamon, vanilla extract, lemon zest, hazelnut cream) the end result will vary.

I love to use puff pastry because of its crunch and when it comes to the apples I choose the sweetest variety on hand.  Making the pastry yourself is an option, but it is such a pain that I always use the store-bought version which works perfectly.  I love making small, almost cookie size, apple tartelettes as it accentuates the crunch of the pasty against its sweet filing.

Ingredients

For the compote:

  • 2 apples
  • 1 teaspoon of cinnamon
  • 1 cup of sugar
  • 1 cup of water

For the tartelettes (makes about 10 tartelettes):

  • 2 sheets of store-bought puff pastry (about 230 grams per sheet, ready rolled out)
  • 4 sweet apples (I use Jona Gold apples)
  • 1 teaspoon of cinnamon
  • 1 teaspoon of sugar per tartelette
  • 1 tablespoon of apricot jam
  • 1 teaspoon of water
  • 1 egg

Instructions

Compote

  • Peel, core and finely dice the two apples.
  • Take a large saucepan and add the apples, sugar, water and cinnamon.
  • Stir to combine all ingredients.
  • Bring the mixture to a boil and then turn it down to medium heat, let simmer for approximately 15 minutes, during this time the apples will soften and the liquid will thicken to a syrup like consistency.
  • Let the mixture cool down.
  • Blend the mixture till smooth.

Tartelettes

  • Peel the apples. Cut them in half and take out the core.  Then slice the apples (medium thickness) into half moon shapes.  If you notice that they are too big in comparison to the circles you’ve cut (see further) you can half them.  Take into account that as the apples will bake in the oven the slices will shrink slightly.
  • Take a sheet of puff pastry. Leave the second sheet in the fridge; it is easier to work with the pastry when it is cold.  Only take it out when you are going to make the tartelettes.
  • From each sheet of pastry, cut out 5 circles of 12 cm. I have a cookie cutter of this shape, if you don’t, you can use a small plate and cut around the plate.  The size might be a bit different, so you might not end up with 10 tartelettes.
  • On each circle of pastry spread out 1 tablespoon of compote, leave about a cm between the compote and the edge.
  • On top of this arrange the apple slices in a circle.
  • Sprinkle 1 teaspoon of sugar on the apples.
  • Roll up the edge of the pastry to ‘close up’ the apple tart to ensure it holds the filling. If you feel like it you can pinch the pastry all around so you get a nice shape.
  • Put the egg in a bowl and whisk it. With a small brush put some egg wash all around the edges of the folded puff pastry, this will ensure the pastry turns a nice golden color when it bakes.  For decorative purposes you can sprinkle some sugar on the egg wash (and even some toasted almond flakes for extra crunch).
  • Put them in a preheated oven of 150°C for about 45 minutes. It is important to bake the tartelettes slow so the apples cook all the way through.
  • Once the tartelettes are ready, take them out of the oven and let them cool down.
  • Mix the apricot jam and the water and brush a thin layer of this paste all over the tartelette (over the filling and the edges).  This will give it a nice shine.

If you prefer making the pie-size version of this apple tart, which takes less time and is as delicious, you just need one sheet of puff pastry and fill it with the compote and apples as per the instructions above.

Let’s eat!

signature

Sunshine in a ramekin …

crème brûlée I have not met anyone yet that does not like crème brûlée (and I probably don’t really want to).  The only struggle I have when making this dessert is the blowtorch part just before serving.  Not because it is difficult, but because I am the owner of a rubbish blowtorch which always results in a lot of swearing and a couple of burnt fingers.

There are lots of variations on this dessert, people seem to love to put all kinds of stuff in the cream (fruit, chocolate, I have even seen versions with chilly and ginger) however I like the classic version the best.

A lot of recipes require baking these babies in the oven in some kind of bath consisting out of a roasting tin filled with water.  Given my inert clumsiness I don’t follow this rule – it’s too complicated and I’ll either short-circuit my apartment building when the tin tips over in my oven or get loads of water in the crème brûlée.  I just put the ramekins in the oven at a very low temperature for about 1h30 and they turn out perfect every time.

Ingredients

  • 50 cl of cream
  • 75 grams of powdered sugar
  • 5 egg yolks
  • 1 vanilla pod
  • 100 gr of sugar

Instructions

  • Cut the vanilla pod in half and scrape out the vanilla seeds.
  • Pour half of the cream into a saucepan, add the vanilla seeds and the pod and heat up gently.  I use a heavy bottomed sauce pan to avoid the cream from heating up too quickly and burning.  Whatever you use, keep an eye on it and stir often!
  • Whisk together the powdered sugar and egg yolks until the mixture goes from yellow to a soft yellow, almost white-ish color.
  • Incorporate the cold cream into the sugar-egg mixture.
  • In the meantime the cream in the sauce pan should be hot, take it off the heat and let it cool down for 2 to 3 minutes.  The reason for the cool down is that if you would pour the hot cream directly into egg mixture this might result into curdling (= scrambled eggs).
  • Whilst whisking vigorously, pour the hot cream into the cold sugar, egg and cream mixture.
  • Now put the mixture in the fridge in order for it to cool down (about 2 hours).
  • Pour the liquid into ramekins, depending on the size this will make 4 to 6 portions.
  • Put them in a pre-heated oven of 100°C for 1h15 to 1h30 minutes.  They are done when the cream has set.
  • Transfer the ramekins to the fridge so they can cool down.
  • Just before serving sprinkle some sugar on top of the cream and with a blowtorch caramelize the sugar.  If you do not have a blowtorch you can use your oven grill.

I hope you enjoy it!

Let’s eat!

signature

Lemon blueberry loaf/cake

unnamed

I am not a huge cake fan – any kind of dessert involving cake or sponge does not really get me very excited.  I especially don’t like tier cakes, they look beautiful (well at least the ones other people make, mine tend to look like a toddler’s craft project) but the combo of cake and then very rich icing is too much of a good thing for me.

After having said all that, I did come across a recipe that looked interesting.  I was browsing through Julia’s blog (great blog by the way … have a look for yourself: juliasalbum.com) and saw she made a lemon and blueberry loaf.  My husband being a lemon-o-holic at home, I was sure he was going to like it.  You can find Julia’s recipe here.

I used frozen berries which worked perfectly – I defrosted them quickly in the microwave (just defrost them, don’t leave them too long in the microwave or they will turn to mush) and added them to the batter.  The other thing I changed was I doubled the lemon glaze quantity because I did two rounds of drizzling to make sure there was a nice thick layer of glaze on top of it – I like sugar, what can I say?

The cake/loaf has the consistency of a muffin, which for a cake hater like me is great.  I was really delicious.

Ingredients

Loaf/cake

  • 1/3 cup melted butter
  • 1 cup white sugar
  • 2 eggs
  • 1/2 teaspoon vanilla extract
  • 1 and 1/2 cups all-purpose flour
  • 1 teaspoon baking powder
  • 1 teaspoon salt
  • 1/2 cup milk
  • 2 tablespoons grated lemon zest
  • 1 cup fresh or frozen blueberries
  • 2 tablespoons all-purpose flour
Lemon glaze:
  • 4 tablespoons freshly squeezed lemon juice
  • 1 cup powdered sugar

Instructions

Loaf/cake

  • Preheat oven to 175 degrees C.
  • Butter an 8×4 inch loaf pan, line the bottom and two sides of the pan with the parchment paper.
  • In a mixing bowl, beat together butter, 1 cup sugar, eggs, and vanilla extract.
  • In a separate bowl, combine flour, baking powder and salt; stir into egg mixture alternately with milk.
  • In the same bowl where you combined flour, add blueberries and toss them in 2 tablespoons of flour. This will help prevent blueberries from sinking.
  • Fold in lemon zest, and blueberries into the batter. Do it carefully and fast. Pour batter into prepared pan.
  • Bake in preheated oven for about 50-60 minutes, until a toothpick inserted into center of the loaf comes out clean. Cool bread in pan for 40 minutes on a wire rack. Release the bread from the pan.

Lemon glaze

  • Combine freshly squeezed lemon juice and powdered sugar in a small bowl and beat, using electrical mixer, until smooth glaze forms .
  • Drizzle the top of the bread (after it’s been completely cooled) with the glaze. Some of the glaze will go down the sides of the bread.

Let’s eat!

signature

Lebanese spice patatoes (batata harra)

batata harra (2)Having a Lebanese husband I need to indulge him now and then with a home cooked Lebanese meal.  Something that is always part of these meals (and always a hit) is batata harra, which are spicy Lebanese fried potatoes.  It is a simple dish but very delicious – you can make it ahead and reheat it, great for leftovers.  Reheating anything fried probably does not sound like something you would associate with the term delicious, but here it works.  The coriander gives it a wonderful, almost lemony, taste which I love.

Ingredients:

  • 1kg of potatoes (you can use any kind of potato – I like using new baby potatoes)
  • oil for frying the potatoes (any flavorless oil, for example sunflower or peanut oil)
  • 1 medium hot chili pepper
  • 4 spring onions
  • a large bunch of fresh coriander (about 40 grams, stalks and all)
  • 2 to 3 tablespoons of olive oil
  • 1 teaspoon of salt

Instructions:

  • Wash the potatoes.
  • Cut the potatoes in bite size chunks, no need to remove the skin.
  • Fry the potatoes but do not fry them till they are crispy, they work best in this dish when they are still a bit soft.  Once fried, put them to the side.
  • Cut the chili pepper very finely, if you like it hot leave in the seeds, if you don’t take them out.
  • Cut the coriander very finely, stalks and all.
  • Slice the spring onions finely.
  • Fry the chili, coriander and spring onions in a generous amount of olive oil (2 to 3 tablespoons).  Add the salt.  Once the chili and spring onion are soft, the coriander should be ready as well and a lovely smell should come from your pan.  I prefer doing this in a wok, I am a messy cook and once the potatoes get added using a wok prevents everything from flipping out of the pan and making a mess in the kitchen.
  • Add the fried potatoes and mix them in with the fried chili/coriander/spring onion mix.

If you like lemon, just before serving you can put a generous squirt of lemon on it.

Let’s eat!

signature

Bloglovin site & app

bloglovin

I am struggling to keep up with all of the blogs that I like to read and I’ve looked around to find sites or tools that will gather posts from different blogs and so far the best one I found is bloglovin.  There is the site (bloglovin.com) or you can download the app in the itunes store, either way you get a nice overview of all new posts of your favorite blogs.  I really enjoy using it and reading on it.

You should give it a try!

Carlos

Let’s talk about buns …

In a desperate attempt at avoiding supermarket burger buns that taste like cotton balls, I started looking for a good recipe to make them myself.  The ‘All Recipes’ website has a great recipe for burger buns that I slightly adjusted based on the comments that had been left with the recipe and my own attempts.  They are simple to make, just take into account however that there is a good two hours of rising needed to make the dough light – firm buns are only delicious when they are attached to a man.

Burger buns

The ingredients are as follows:

– 235 ml milk

– 120 ml water

– 55 g butter

– 560 g all-purpose flour

– 10 g instant yeast

– 25 g white sugar

– 9 g salt

– 2 eggs (1 for dough, one for egg wash)

– sesame seeds

Start with heating the milk, water and butter together (don’t boil them, just heat them through), this can be done in a sauce pan on the stove or in the microwave.

Mix yeast, sugar, salt and half of the flour with the milk/water/butter mixture and one egg.

Beat the mixture until smooth.

Put in the remaining flour, one cup at a time, beating in between each addition.

Turn the dough onto a lightly floured surface and knead the dough until smooth and elastic (about 10 minutes).

Heat the oven to 40 degrees C and put the dough into an oil greased bowl covered with a damp towel and let rise for an hour.  The dough should about double in size.

After an hour, turn down the oven, take the dough out of the oven and out of the bowl.  Divide the dough into 12 pieces and put them on a tray and back in the oven for another hour of rising.  Try not to handle the dough too much, leave it as is, otherwise the buns will turn out too dense.  The oven is turned of to avoid the dough from drying out.  Also don’t put a towel or cling film on them because it will stick to the buns and ruin them.

After an hour take them out of the oven, brush the top with the egg wash and sprinkle some sesame seeds on top of the buns.

Preheat the oven at 200 degrees C and then bake for 10 to 15 minutes until golden brown.

Enjoy!

signature